Sunday, December 30, 2012

Hard Drives: Old(1994) vs New (2012)

This is a quick post. Somewhere this year (2012) i got myself a neat 2TB harddrive (model WD20EFRX ) for my NAS (Network Attached Storage) and decided to take my 1994 261,30 MB hard drive (model ST3290A ) out of the shelf just to visually compare them.


Thats it boys and gals! On the left we have a 261MB hard drive and on the right a 2TB hard drive. Thats not even GigaBytes but MegaBytes!! Mind you that 1GB is 1024MB and the same logic goes for TB to GB.
So the hard drive on the left has about 0.01% of the storage capacity of the hard drive on the right.

We've come so far...


 A view of the back of both hard drives.


See you again in 18 years, HardDrive technology!
To be honest in 18 years i bet mechanical hard drives will be history in the desktop computer\laptop plataform and SSD will be the prefered way to storage our data.
Prove me wrong future readers!


Saturday, October 27, 2012

Demo and Disassembly of the Casio F-91w

Back in 1992 +/- i felt like a modern little man because i got my first Casio F-91W. It didn't last 3 months. Not because the watch was poorly designed or had major weaknesses but mainly because no watch used to last more than 3 to 5 months with me as i was always disassembling them and testing them underwater, sometimes boiling water, overvolting, etc, etc...Yeah i was a little maniac.


Today these clocks and other variants are a retro-fashion. Also they were\are used a lot in bomb attacks and actually giving them an unfair bad reputation for being a terrorist watch. This couldn't be more unfair because any alarm clock can be used for a bomb, you just need how to connect it to the circuit. I'm not going to tell you :) Although you might already know. Don't bomb anyone please, and enjoy these little but awesome early 90's clocks.


Here you can se various variants of this clock. The one on the right is a Casio A158W and it's the one i use, the gold one on the is a A168 and belongs to my wife. The white one near to the F-91W is a fake Casio clock.


This clone stinks of fake as the LCD segments look different from the original Casio LCD, the beep alarm sounds different and even the display light mimics cheesy discoparty collored blinking lights.


I disassembled both and putted them side by side for comparison.


Here you can see the brains of the original Casio clock. Simple and elegant (apart the unevenly spreaded blobby epoxy over the IC).


Here is the fake one. Urgh!


I did a small video demoing both and disassembling them, showing some of the features!

Enjoy!


Sunday, July 15, 2012

Acer Aspire 5600 Series DISASSEMBLY AND REPAIR


Acer Aspire 5600 Series with a bad LCD


Today i have this laptop with a faulty screen. So at least i was betting that it was the screen that was faulty since i could get a good video signal output through the VGA port, but before disassembling it i had another thing in mind.


I should try to shake slightly the cable that connects the main laptop assembly with the screen as it is very much subject of violence through all it's life with screen open\close cycles. For this i only had to remove the top faceplate with the power button which was remarkably hard to remove, probably the hardest one ever. That or i just wasn't doing it right :)
Turns out that wasn't it, so i really had to disassemble the screen. I would only want to do this as a last resort.


After removing the screws around the screen (that are usually covered with small plastic dots), i had to remove the lcd screen brezel using an old credit card so that i wouldn't "hurt" the soft plastic.


Twenty screws later and a few sweat drops, i had the lcd freely standing on my bench. Time to inspect it.


Model number just in case i need a replacement.


 I started peeling the duct tape around the edges in order to find the chips-on-film display drivers. I suspected it could had some bad connection between them and the LCD.


And here they are. Three of them at the left side of the screen.


A closer look.


With the LCD connected to the screen i tried to move them back and forth really...i mean REALLY gently, and guess what..


I was able to get a full picture on the display. But in order for that to happen i had to keep constantly pressing the chip-on-film lcd driver in that position.


Nothing a small roll of duct-tape filling that gap couldn't handle.


And here it is with everything in place. Bare in mind, this LCD is permanently damaged (probably due to some drop or physical violence) so this fix isn't permanent at all. I expect the problem to reappear and to get  worse and worse eventually leading to a screen replacement. But this is better than nothing, and there is a slight chance that this will last for long this way. Time will tell.


Everything is assembled and working. I really hope this lasts for a while, as someone seems to need to play some Counter-Strike on this :)
Nice wallpapper by the way.

Saturday, July 14, 2012

MacBook Pro A1260 TIP

MacBook Pro A1260 with damaged GPU

 If this happens to your MacBook Pro and you know that your GPU is a Nvidia 8600m GT, have no fear! Also, don't try to fix it, don't do anything!


This is caused by the GPU due to a packaging defect. The symptoms are artifacts on the screen and no DVI output. Apple takes full responsability for this and will replace your whole motherboard for free!

Here is a quote from the apple support site:
"In July 2008, NVIDIA publicly acknowledged a higher than normal failure rate for some of their graphics processors due to a packaging defect. At that same time, NVIDIA assured Apple that Mac computers with these graphics processors were not affected. However, after an Apple-led investigation, Apple has determined that some MacBook Pro computers with the NVIDIA GeForce 8600M GT graphics processor may be affected. If the NVIDIA graphics processor in your MacBook Pro has failed, or fails within four years of the original date of purchase, a repair will be done free of charge, even if your MacBook Pro is out of warranty."
 
You can read more here http://support.apple.com/kb/ts2377 . Actually i would advise you to print this before going into an Apple store.


Do this before it is too late! You have four years counting from the original date of purchase!

XFX GeForce 9600gt Alpha Dog Edition autopsy


XFX GForce 9600GT Alpha Dog Edition from 2008\2009
 
 
This must be the first unboxing of an already used and dead item on a blog i guess.


 My beloved graphic card that gave up the ghost a week ago because of a stucked fan. It's a Geforce 9600GT overclock edition. It performed nearly neck to neck to the geforce 9800GT, and i got as a RMA replacement of my former Geforce 7900GT (second hand) that decided to add funny artifacts all over the screen when i was playing something. So this 9600GT must be my first hand graphic card that died on me.


This is a picture taken in 2009 a minute after it was unboxed for the first time. Bellow you see a Geforce 3 ti500 (king of graphics back in 2001) as a size comparation.


Here i removed the cooler faceplate and you can see that the fan has been scratching for a while on it.


 After pressing on it i could see that the fan bearing was all weared out as i could make the rotor bounce back and forth quite easly.


Ouch. Burned plastic near the fan. This puppy must have been heating quite a lot before dying.


 I should remove the cooler now for further inspection. For this i had to remove four screws on the back of the card.


 This card uses a black pcb and even so it has quite noticiable burn marks between the ram chips.


 More of the same here. This card is completly unrepairable now.


 Most voltage regulators were completly shorted although i measure them in circuit, so the circuitry around them could be shorted, or both. This justifies why the computer immediately shutted down when i tried to power it up. The PSU short-circuit protection kicked in just in time before anything else was damaged. Replacing the voltage regulators would be pretty futile as the memories are burned for sure and who knows what else is burned here. Besides each voltage regulator should be at least 1 or 2 euros, plus a new cooler, and the risk of it not working in the end make this repair not worthy at all. Out to the recycle bin you go! :(


 Oh this is the key for the 3DMark Vantage that came with the card. It's yours!


 This card shortlived as i would expect more years out of it. Why would you ask in a day and age where this sort of item becomes obsolete within 2 years? Because computer hardware remains with me as long as it works and it is still useful. I retired a Pentium 3 with a voodoo 5 one month ago as the motherboard and the memories were getting completly faulty giving me errors and all sort of weird symptoms.
Well now i have the perfect excuse to get a new graphic card :)

Sunday, June 17, 2012

DISASSEMBLY AND REPAIR: IVT L-2021

IVT L-2021 from 1996\1998

ITV, this is the brand of this CRT televison set. Could this be an Apple Product? A big "NO", by far! This is one of those rebranded televisions, which is obviously a cheap quality tv. Even so it has relatively nice and big (?) screen but it was completly dead. When plugged in you could only hear a short beeping coming from the switching power supply. Something was quite obviously shorted on the secondary side of the circuitry of the tv. Time to take a look.


Needless to say that there was a dusty mess inside as always with CRT sets. Ok it was not that bad but a cleaning job was on its way..


I removed the whole chassis from the cabinet leaving behind only the speakers and the CRT itself.


Having the chassis freely standing on my bench, it was time to clean the dust and to inspect it for possible visual problems.


A burned resistor, although this wasn't the only one in this condition, they were still within value, but replacement was required and on its way.


A cracked polyester cap. Actually one of the leads separated completely right after i bent the capacitor just a tiny bit towards the flyback transfomer. This one had to go as well.


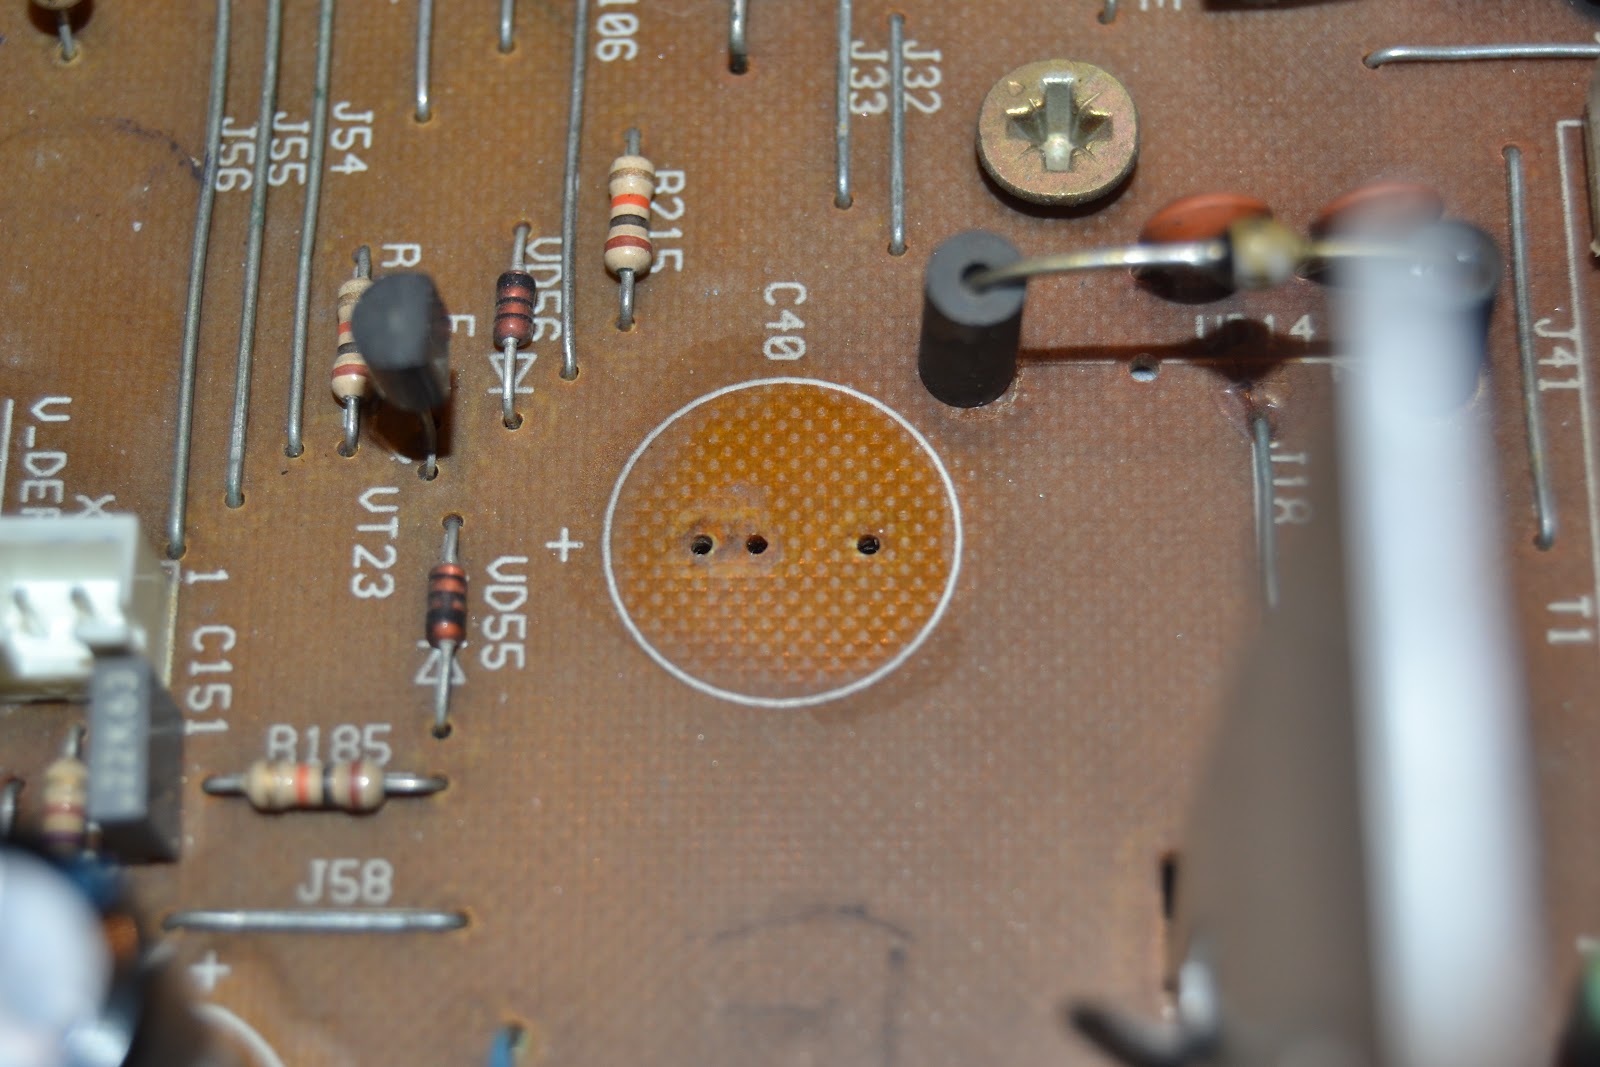
A really bad looking electrolytic. This tells me that this capacitor has been heating for a while. The plastic shell shrunk and broke due to the heat coming from the heatsink nearby. Actually nearly all high voltage or high capacity caps were either buldging\leaking or had its plastic cover shrinking due to heating.


Signs of possible moisture on the PCB since this tv set was living in a kitchen all its life.


 And this is over the high voltage area. Actually this was almost over the whole mainboard and also on the CRT neck board as well. It had to be clean.


Bad solder joints. No wonder the owner complained that he could barely hear the audio from the tv. This is the amplifier IC chip which had nearly 50% of its solder joints broken. Actually this tv ended up being target of some physical violence in order to "play right" :)
No wonder there were a whole bunch of broken solder joints in other areas on the pcb as well. All that was repaired too.


None of this helped the tv work again, so i started checking the usual suspects. Turns out that a NPN fast switching transistor used for the horizontal deflection was shorted on two pins. In the picture on the left is the defective one, and on the right is the replacement. Time to apply the new one and test the tv again.


And the tv lives again hurray! But wait, what the...?
There are horizontal lines on top of the image, something was not right still.


So i decided to replace all the electrolytic capacitors inside this tv since nearly all of them showed signs of deteoration. If this was not the case i would try to replace the caps in the vertical deflection area only.
Here kitty kitty.


Lets have some fun..or not.


Look at that leak! A whole lot of them were like this. Nasty stuff.


Electrolyte stain on the component side of the pcb. It had to be clean before applying the new capacitor.


After cleaning result. What you may think that its still dirtyness is actually a small corrosion on the pcb caused by acidity.


Job done, all FORTY FIVE electrolytics were replaced. As you can see i removed the flyback transformer to avoid damaging it while replacing the capacitors since there was a lot of board flip-overs during the process!


Polyester cap also replaced!


New resistor in place.


Another new resistor replaced (red one). In fact all burned resistors were replaced.


And voilá, all this work was for nothing as the problem was still there! Well, it wasn't an unworthy work at all as i would have done either way.


At this point the problem was quite obvious, the vertical deflection chip must be defective. I decided to consult the staff at the ukvintage radio forum and after all the work i already had done the general opinion was quite unanimous. The vertical deflection chip had to be bad. Why the vertical chip? Well these lines you're seeing are a small remnant of probably less than an inch of the top of the image being folded over the screen area. Sometimes you could see the lines and a smal activity in them, and some other times you could see this shrink effect above.


Time to replace the defective TDA3653C vertical deflection chip and see how it goes. Bad chip on the left and new one on the right.


Hm. Seems that something went wrong. How annoying...Well after checking and rechecking my solder joints i could only assume i have got a defective chip. How often does this happen? 1/100 so does the store clerk say. I had to pay to get another one by the way.


And finally i got the image right with a second new vertical deflection chip.


Now this is definately more like it! The image is perfect now!


But i still had problems with the audio. This is a stereo TV and i could only get audio on one of the channels, and everytime i cranked up the volume the image would get distorted and audio would get all corrupted.


Even though it was quite evident that it should be the audio amplifier chip TDA7057AQ that was faulty, i decided to test each channel separately. The chip had to be changed and afterwards the audio was perfect and no problems with volume raising anymore!


But i wasn't still free of troubles with this TV. I tried the scart input and for some reason the image was all muddy. Hooking a computer to the tv generating a tv test pattern image made it clear that something was wrong.


After further investigation on the schematics i was able to trace down the video input circuit. It went to the video processor chip and to the tv functions\teletext chip. I couldn't sort what was exactly faulty but i could only assume that it was some problem with the tv functions chip as when i disconnected the video input from it the image went completly clear and perfectly sharpen. I acomplished this by killing the shunt shown in the center of the image above. It wasn't worthy to replace this chip as the rest of it was perfectly operational and it would be really expensive to do it. The only lost functionality was the teletext through videoinput.


After doing so much, i decided i was going to do a final treat to this tv. I decided to wash the case. For that i removed the CRT, the speakers and a few metal parts.


The cat certainly enjoyed using it as it's new home! Sorry, no can do kitten, that isn't yours!


With everything done, clean and fixed it was time to do some cable managment and assemble the TV once and for all.
You might be thinking, was it worthy? Well money wise it was, it would cost you a whole fortune if you'd get it to a tech store to get it fixed, but if you do it yourself it is pretty much worthy. I didnt waste more than €30 on this, and trust me, i replaced a incredible number of parts to get it going and lasting.
For the trouble it gave me...well if i didn't take this so personal (like a personal exercise) it wouldn't be worthy at all, this took me way too much time and effort. Well, it works now and i hope the owner feels happy with it again, even though it's a completly outdated cheap crt TV :)
I hope you enjoyed it also!